11

Blind Mani – Marbled Holo

 Hey guys! If you follow Jacqui from Craftynail (and if you don’t, you’re missing out!), you will have inevitably seen the LA Girl 3D polishes on her blog. She just recently completed her collection of the polishes, and once I saw that purple, I knew that I had to do the same! And of course, once my package of nail mail arrived, I couldn’t decide on just one of these gorgeous scatter holos to wear– I just had to use ALL the colors! (heh, see what I did there?)

IMG_4265

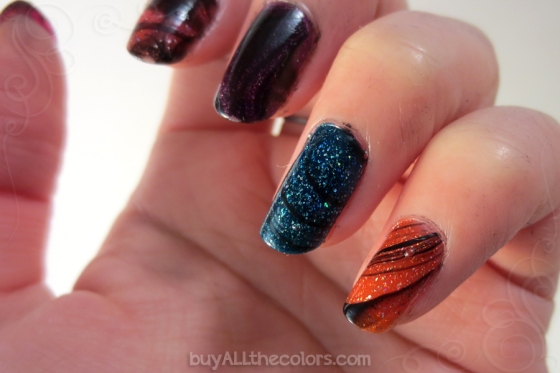
I admit, I squealed a bit once I put all the colors in my completed collection together. From left to right: Dazzling Pink, Brilliant Blue, Sparkle Ruby, Purple Effect, Black Illusion, 3D Silver, Electric Coral, Teal Dimension.

IMG_4283

Ready to see some them on my nails? How pretty are these polishes? I used two coats of each for opacity.

IMG_4253

And despite how much I love these on their own, it wouldn’t be a blind mani without some nail art. I tried water marbling a few months ago, and I’m pretty sure my tap water was too hard because the polishes refused to spread. Luckily though, I didn’t have that problem this time. I wanted to do a black and transparent glittery water marble with Black Illusion and 3D Silver, but it turns out that glitter polishes don’t really marble well, so I just went with a plain black and clear marble.

IMG_4258

And holy cow, when people warn that water marbling is messy, it is messy. I thought it would be about as hard to clean up as a spun sugar mani, but this took me 3 hours of scrubbing with acetone-dipped cotton swabs just to get to the moderately cleaned up state that you see in the other photos. Next time I try a water marble, you can be sure that I’ll be taping off my fingers.

IMG_4268

   And also, does anyone know if bubbling is normal with water marbles? Or how to prevent it? 

But anyway, I am super happy with all my new lovelies, and I’m pretty pleased with how my first ever water marble turned out. I thought that Purple Effect would be my favorite, just because I love all things purple, but Sparkle Ruby is definitely a contender as well. I just can’t pick! Which one of these is your favorite?

5

Blind Mani: Goth Skittles

Hey guys! It’s been a while since I’ve done a blind mani, hasn’t it? To be honest, I haven’t even bought any new nail polish in the past month or two because I’ve just been so swamped with school work for my senior design project. But anyway, I won this Physician’s Formula nail polish trio a while back from a contest they were holding, so I thought I’d give them a whirl!

IMG_4081

The Smokin’ Haute trio consists of a bright red, dark red, and black. All of the polishes have a glossy creme finish, and the box claims that they give a gel-like appearance. I love how these polishes come in trios– even though I already own all of these colors in different polishes, this makes it easy to pick colors that go together when you can’t decide.

IMG_4064

The first thing that I noticed was how short these brushes are. There’s basically no space between the end of the cap and the beginning of the brush. I was worried about this making application more difficult at first, but surprisingly it ended up no different from any other polish brush.

IMG_4065

And here they are on my nails! This is two coats of each color. The box claimed that these polishes are quick drying, and I would agree that they dry pretty quickly. I ended up eating buffalo wings 15 minutes after doing my nails, and I was expecting them to get smudged, but they stayed perfect!

IMG_4073

So after trying out these colors, my boyfriend suggested I go with a goth look. I wanted to try out some of my new stamping plates too, so here’s what I ended up with.

  IMG_4078

And I actually liked how my right hand turned out too!

IMG_4079

Overall, I love how the polish applied and dried quickly, but I wish it was a bit longer wearing. These started chipping on me within two days. Granted, I wore these without top coat, and I’m sure a coat of Seche would have gotten me a few more days out of this polish. Regardless, I will continue to use these polishes because of how easy they are to work with. I think these would also be great for people who are new to doing their nails and want something quick and simple. Have any of you tried these trios out? Are there any other colors that I need to get?

Disclaimer: some products featured in this review were sent to me by the manufacturer as a contest prize. This is not a sponsored post. This post does contain affiliate links. For more information, see my About/Disclaimers/Contact page. 

10

Blind Mani – Fall Leaves

Hey guys! So it’s been steadily getting cooler where I live, and now we’re at the point where you need to put on a jacket before you leave the apartment, and the flip flops have been put away until next year. And of course, there’s my favorite part of autumn– the colorful falling leaves! So that’s where I took inspiration from for this mani.

IMG_3044

I started out with Sephora by OPI in 212-Sephora. I have no idea what the name is supposed to mean…anyone want to clue me in?

IMG_3045

Regardless of the name, this polish is gorgeous. It has a super dark brown, nearly black base and it’s loaded with golden-brown shimmer, flakies, and a sprinkling of holographic micro glitter.

IMG_3036

Here it is on the nails! This is two coats. It’s hard to capture how pretty it is in a photograph, and this one really doesn’t do this polish justice. This polish makes my nails just sparkle whenever they catch the light. On the nails, I mostly just see the warm range of color in the flakies, but I do get an occasional flash of green and blue when I look at them at the right angle.

IMG_3048

The  next polish I used was another Sephora by OPI one. This one’s Come to Pappa-razzi!

IMG_3050

Come to Pappa-razzi! is a clear polish loaded with a blend of large gold hex glitters, medium black hex glitters, and small copper hex glitters. You know how some glitter polishes look great in the bottle but require way too much fishing to get a good amount onto the nail? Well this is definitely not one of them. I needed just one coat with no fishing to get a nice coverage of glitter.

IMG_3038

And here’s the final look! I topped an accent nail with Come to Pappa-razzi! and stamped on some leaves with Essie Penny Talk and my BM m47 plate. Despite my awful stamping skills, I really like this mani. And maybe the broken up stamps make the leaves look more realistic? Maybe?

Anyway, I’ve definitely found some new favorite polishes for fall. What are your favorite fall colors to wear on your nails?

13

Blind Mani: Glitter Over Nude

Hey guys! The other day when I was out shopping, I had the best luck ever. If any of you live in a big city, you know how hard it is to get new or limited edition products. So when I just happened to catch the CVS workers restocking the Sally Hansen shelves, I rushed over, and sure enough there was a new display of the Fall 2013 limited edition Xtreme Wear polishes! I may or may not have squealed out loud in the store.

IMG_2855

Since I’m trying to limit my beauty budget, I only bought three of the shades. I know, so very not buyALLthecolors. From left to right: Glitter Gun, Spark in the Dark, and Frazzle Dazzle. All of the ones I got consist of a clear base with a mix of glitters.

IMG_2862

First up is Glitter Gun.

IMG_2864

Glitter Gun has large and medium gold and white hex glitters, gold micro glitter, and white bar glitter. It looks like it has black hexes in some of the photos, but that’s just the lighting on the gold ones.

IMG_2856

Spark in the Dark is almost exactly like a black version of Glitter Gun.

IMG_2858

It has large and medium black and gold hex glitters and micro glitters, and black bar glitter.

    IMG_2859

Frazzle Dazzle consists of all different sizes of copper hex and micro glitters as well as some black bar glitter.

IMG_2861

Okay, so first of all I want to say that this mani was not entirely my idea. I loved the glitter over nude look from this mani that Christina from The Bubbly Brunette did so much that I just had to try it out for myself. I’m wearing a base of one coat of Wet n’ Wild 2% Milk topped with two coats of each of the glitters: Frazzle Dazzle on my thumb and pinkie, Glitter Gun on my index and ring, and Spark in the Dark on my middle finger.

IMG_2891

My nails are a little stained from a dark mani I did earlier this month, and the base color didn’t quite cover that up, sorry! And as with all glitter polishes, photos didn’t quite do this justice because they can’t capture the sparkliness that you get whenever you move your fingers.

I was pleased by all of these polishes, but not blown away. They all applied smoothly and dried in a reasonable amount of time, as I have come to expect from Xtreme Wear polishes. The finish is pretty smooth on its own, although one coat of topcoat will completely smooth out the glitter bumps. There was no glitter curling at all, and the glitter was well suspended in the polish and I didn’t have to fish for it.

That said, I feel like the glitter could have been a little denser. Two coats isn’t unreasonable for a glitter topper, but it would have been nice if I could have gotten a bit more glitter in one coat, particularly with Glitter Gun. I also feel like the black bar glitters in Frazzle Dazzle were unnecessary. It does make it more unique, but I think I would have liked just the copper glitters better– that’s just my opinion though. Overall, I think that all three of these are worth picking up if you run across them, and I’ll can’t wait to try them out in other manis and over different colors as well.

Have any of you tried out these polishes yet? What did you think? And are any of the other colors worth buying too?

14

Blind Mani – Black Glitter Crisscross

Hey guys! Remember all those times I’ve said that I don’t like textured polishes? Well, I just used a solid colored textured polish and realized that the texture on some of these isn’t that bad. Then I remembered all the super glittery textured polishes that everyone else has been using, and I had to have one for myself. You all, with your swatches and textured manis, have converted me to a textured polish user.

Oh, and it didn’t hurt that I had coupons. More free nail polish anyone?

 IMG_2599

I got A-Nise Treat from the Nicole by OPI Gumdrops collection. I’ve never really cared until I started blogging, but now I have a new appreciation for square bottles– so easy to position for photographs. You don’t even want to know how long it took me to get these to stop rolling away.

IMG_2616

A-Nice Treat is a black textured polish with tons of silver glittery bits in it. The texture is rougher than Sally Hansen Sugar Coat polishes, and is especially noticeable if you get any on the tips of your nails. I just cleaned that up right away, and had no problems with scratching or snagging afterwards.

IMG_2628

And here’s what I did with it! First I painted a base of Icing Twilight on all of my nails. Then I used striping tape to make the crisscross pattern and used two coats of A-Nice Treat over top. It was so sparkly in person, especially when I stepped out into the sunlight.

So as I said, I’ve been against textured polishes since they came out, but I’m finally getting into the trend. I have a pitiful two textured polishes in my collection, but I’m hoping to add more! Any suggestions for glittery textured polishes that aren’t too rough?

11

Blind Mani – Black and White and Glitter All Over

Hey guys! My blind mani bucket has been overflowing lately, so I went a little bit crazy on this one to help clear it out a bit.

First up is Sally Hansen Sugar Coat in Sugar Fix. I know I’ve said so many times here that I prefer to have smooth nails, but I had seen a bunch of reviews that all said that the grittiness isn’t too strong in the Sugar Coat polishes. Plus, I had a coupon that made this polish only $1.

IMG_2241

Anyway, Sugar Fix is a pure white textured polish. The first coat is a little bit uneven, but a second coat evens out the “sugar” bits and brings it to full opacity. This polish also dries really quickly, which is always nice. And the other reviewers were right– this doesn’t have an extremely rough surface. I have had no problems with it snagging on clothing or hair.

IMG_2212

On the opposite end of the color spectrum is an Icing polish in the color Twilight.

IMG_2216

Twilight is a black polish with silver microglitter. It dries to a semi-matte and somewhat gritty texture because of the glitters.

IMG_2317

Next is a polish from Forever 21’s Love & Beauty. I really wish they would print the names of the polishes on the bottles, but after looking it up online, I think this one’s called First Snowfall.

IMG_2319

First Snowfall appears to be a linear holographic top coat. It never gets fully opaque, but you get a full coverage of holographic glitter in two coats. It also has a slightly gritty texture when dry from the glitter bits.

IMG_2320

After that is another Love & Beauty polish. I can’t find the name of this one online though. If anyone knows what it’s called, please leave me a comment and tell me!

IMG_2322

This one is a silver scatter holo with small and medium glitters. The consistency was a little thinner than I would have liked, but definitely not the end of the world.

IMG_1678

Next is this unnamed Rue Beaute polish from Rue 21.

IMG_1680

This is a mix of small, medium, and large silver glitters. The consistency of this polish was super thin– I’d shake up the bottle, and by the time I had painted one nail, the glitters had all settled to the bottom again. Not the most fun to apply, but the actual glitters were awesome.

IMG_1428

Lastly is another Icing polish, Milky Way. I had actually used this one before in the Black and White day of OMD, but I never showed the bottle…so here it is!

IMG_1429

Milky Way is a black and white splatter polish with small, medium, and large black and white glitters, as well as black bar glitters. It’s quickly become one of my favorite toppers!

Whew, that was a lot of polishes. Ready for the final look? Please excuse my nail nubbins, it bothers me when my nails get so long that I can’t text properly, and this was right after I cut them.

IMG_2490

Like I said, I went a little bit crazy here. Thumb is two coats of Sugar Fix topped with two coats of the Rue Beaute glitter. Index finger is two coats of Twilight. Middle Finger is one coat of an old polish, Sinful Shine Steel Reserve, topped with two coats of the Love & Beauty holo glitter. Ring finger is 3 coats (although it’s as opaque as it’s going to get in 2) of First Snowfall, topped with two coats of Milky Way. Pinkie is two coats of Sugar Fix.

IMG_2500

I got massive amounts of bubbling on my middle finger because I got a bit impatient and globbed on the glitter, but I’m sure I would have had better results if I just brushed the polish on like a normal person. And why did I decide to use a holo topcoat as a base? Because I’m dumb and didn’t realize it was meant to be a topcoat I CAN, that’s why. I do kind of like the effect now anyway.

So which nail do you like best? Glitter, holographic, textured, splatter– so many nail trends to choose from lately! I know holo will always have a special place in my heart.

14

Blind Mani – Vampy Louboutin

Hey guys! I’ve got another blind mani for you today!

IMG_2312

First up is Wet n’ Wild Spoiled Ants in My Pants. The name is so cute and clever!

IMG_2315

Ants in My Pants is a red micro and hex glitter suspended in black jelly.

IMG_2297

It definitely didn’t disappoint! I think Spoiled has some of the best glitter polishes in terms of glitter density, and that was true for this polish as well. What you see is two coats of black polish topped with one coat of Ants in My Pants. It took absolutely no fishing, and the application couldn’t have been easier.

IMG_2200

But wait, there’s more! Next up is Icing Love Letters. I just got this polish a few days ago, and I’ve been dying to try it out.

IMG_2202

Love Letters is a cranberry red polish with a slightly frosty finish and flecks of silver shimmer. I can’t wait to wear this one over Thanksgiving or Christmas.

IMG_2303

And here’s the finished look! I used two coats of Love Letters on the undersides of my nails. It looks a bit darker here than in the bottle because of the black on the other side of my nails.

I’ve been both intrigued and intimidated by the “Louboutin” underside nail look ever since I first saw it. After trying out the look myself, I can say that it was not as hard or as messy as I had anticipated. Jacqui had mentioned in her underside mani that using a thin brush helped, but since I didn’t have one, I just went ahead and used the brush from the bottle and kind of stuck it underneath my nail and gave it a wiggle until the underside of my nail was coated, if that makes any sense. Obviously this left a bit of polish on my skin as well, but it wasn’t anywhere near the “crime scene” amount that I had feared. I tried removing the excess polish right away with a cotton swab dipped in nail polish remover, but that turned out to be difficult to not wipe off the polish on my nails, so I ended up waiting until the polish was dry and peeling it off with tweezers. Overall, I’m super pleased with how this mani came out. I loved both of the new polishes I used, and can’t wait to try more nail underside polishing!

What do you guys think of underside manis? Have you ever tried it out? And do you have any tips for polishing under your nails?

11

OMD Day 4 – Black & White

Hey guys! It’s the fourth day of the OMD 31 Day Challenge hosted by the awesome BrijitJacqui, and Eeeek! And happy Independence Day to everyone here in the US!

IMG_1442

So I might have used this challenge as an excuse to go and buy another nail polish. But when I read “black & white” my mind immediately went to splatter polishes. So I needed to have one. My middle nail looks a little wonky because I tried using tape to create the zigzag, but I was too impatient to wait for the white layer to dry before putting the tape down. What’s really face-palm worthy is that I had my drying drops right next to me and I forgot to use them. Ugh. Also, my pinkie is actually a shimmery white color. The shimmer didn’t get captured by my camera though, so you’ll just have to take my word for it.

Polishes I used:

White – Sally Hansen French White Tip

Thumb – Scherer Petites Midnight Frost

Pinkie – Wet n’ Wild Break the Ice

Black – NYC Black Lace Creme

Splatter – Icing Milky Way

10

Doctor Who Silence Inspired Nails

AHHHHH OH MY GOSH, WHAT IS THAT?!  WHAT’S WRONG WITH IT’S FACE? LOOK BEHIND YOU!!!

 IMG_1138

Hey guys! As you might know from my Dalek nails, I’m a huge fan of Doctor Who. I decided to– hey, where did these marks come from? AHHHHH WHAT IS THAT?! WHERE DID THEY COME FROM? THERE’S HUNDREDS OF THEM!!

IMG_1141

–do some super simple nail art inspired by the Silence. To keep with the theme of drawing tallies straight on the skin, I just base coated my nails and then went to town with my Migi nail art pen in black. For dramatic effect, I added some more on the rest of my hand with black eyeliner because– OH MY GOSH WHAT ARE YOU? HOW DID YOU GET IN HERE? GET OUT OF MY HOUSE!!!

P.S. I’m sorry if this freaked you out. I removed these right after I took photographs because I was afraid I’d wake up and see these first thing in the morning and scare myself. And if none of this post made any sense to you, go watch some Doctor Who! 😀

12

Physician’s Formula Shimmer Strips Eyeliner for Brown Eyes

Hey guys! I was very pleasantly surprised with these eyeliner pencils.

 IMG_0757

They’re part of Physician’s Formula’s shimmer strips line, so they have a bit of shimmer to them. I love Physician’s Formula products because they have never given my skin problems, so I was hoping that these would not irritate my eyes like some other eyeliners do.

IMG_0704

I also love how the colors come packaged in sets according to eye color. Obviously, I have brown eyes. I like wearing purple eyeliner too, so this worked out perfectly. The eyeliner twists up, which is awesome because I hate sharpening wooden eyeliner pencils. They do come with a built-in sharpener, but I haven’t used that yet. Honestly, I don’t even know why there is a sharpener because of the twist up design.

IMG_0752

Okay, I swear my skin is not as pale as in that photo. I have no idea what my camera was doing, but that was the only photo where the shimmer showed up. The shimmer really isn’t noticeable on the eyes unless the light hits it just right.

The first thing that I noticed when swatching these was the formula. These pencils are so soft! That definitely helps with my not wanting to irritate my eyes plan. When I went to wash these off, I had to really scrub. I tried first with just water, and that only faded the color halfway. It took soap to get the lines completely off. The package claims that these will last 24 hours, but I haven’t had the occasion to keep my makeup on for that long yet. I have worn these through an entire work day without them budging though!

I wish these came in white, as that would complete my set of eyeliner colors that I use most often. But other than that, I think these might become my new go-to eyeliners. And so far no irritation with my eyes, even with the shimmer bits in these, yay!