0

Candy Cane Nails

Hey guys! Remember when I told you about the game I was making with my team for one of my classes? We decided to all dress a little bit candy themed during our presentation– some people wore bright colors and one girl had a gigantic lollipop necklace. Obviously, I decided to showcase my candy influence on my nails.

 IMG_3739

This was a super quick mani because I was rushing to finish all my other finals, but on my left hand I did two coats of a sheer golden white Love & Beauty polish and then striped on the red with ORLY Red Carpet. And because it was one of my tasks on the team to come up with a way of loading our game with gratuitous amounts of sparkles from the candy gems, I topped it all off with Urban Outfitters Unicorn for a glittery finish.

IMG_3741

And because my broken nail is still growing out, I’ve been covering the flaky edge with textured polishes recently, so I did a simple red and white pattern with Love & Beauty Fire & Ice and Sally Hansen Sugar Fix.

15

DIY Leather Effect Polish

IMG_3402

Hey guys! I’m super excited to be sharing this with you today, because, if you can’t tell from the title, I recently found a way to imitate the Nails Inc. Leather Effect polish finish! Yes, that’s my version of it above! I’ve been lusting after Leather Effect polishes ever since I first saw them, but at $11 a bottle, I never felt like I could justify purchasing any. I actually found out how to recreate this look completely by accident too, but it’s so simple and you can make it in any color you want.

Untitled-2

Just for comparison, here’s what the Nails Inc. Leather Effect polishes look like. These photos are not mine– they’re from Nails Inc promos. Like I said, I don’t actually own any of their Leather Effect polishes, but check out some more close-up swatches of them over at Short & Sweet In Texas and Brijit’s Dijits!

IMG_3403

Okay, so in order to get this look, all you need is any regular textured polish and acrylic paint. The textured polish base I had for this was my Halloween mani, and I discovered the trick when I finished early in my painting class and decided to paint over my nails with leftover paint from my palette. Yay for happy accidents! I used Utrecht brand Dioxazine Purple heavy body acrylic paint for this, but I think any acrylic paint would work. As you can see, some of the sparkle does still show through the layer of acrylic paint.

But Kitsu, I don’t have any acrylic paint! What can I do?

 IMG_3412

Well, I wanted to see if I could recreate the look with nail polish too, so here I’m starting with two coats of Sally Hansen Sugar Fix, which is a matte white.

IMG_3417

From thumb to pinkie, I topped each nail with two thin coats of: Sally Hansen Golden-I, Sinful Colors Whipped, Urban Outfitters Dunks, Revlon Emerald City, Sinful Shine Dark Room. The key is to keep the layers thin enough that you don’t completely smooth out the texture. Since Dunks and Dark Room are glossy, I topped each of those with a matte topcoat as well, but that ended up being too thick and taking away almost all of the texture. I think Whipped and Emerald City gave the most authentic look, as they are both matte polishes. Golden-I definitely shows the leathery texture, and I love the metallic look too. So if you want to go with more of the original matte leather look, you will probably have to stick with acrylic paints or polishes that have a matte finish on their own, but other finishes can definitely work as well, as long as they go on in thin coats.

So do you think these work as a DIY imitation? I can’t compare them for myself, so I’d love to know what you guys think!

11

Blind Mani – Black and White and Glitter All Over

Hey guys! My blind mani bucket has been overflowing lately, so I went a little bit crazy on this one to help clear it out a bit.

First up is Sally Hansen Sugar Coat in Sugar Fix. I know I’ve said so many times here that I prefer to have smooth nails, but I had seen a bunch of reviews that all said that the grittiness isn’t too strong in the Sugar Coat polishes. Plus, I had a coupon that made this polish only $1.

IMG_2241

Anyway, Sugar Fix is a pure white textured polish. The first coat is a little bit uneven, but a second coat evens out the “sugar” bits and brings it to full opacity. This polish also dries really quickly, which is always nice. And the other reviewers were right– this doesn’t have an extremely rough surface. I have had no problems with it snagging on clothing or hair.

IMG_2212

On the opposite end of the color spectrum is an Icing polish in the color Twilight.

IMG_2216

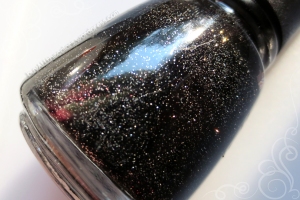
Twilight is a black polish with silver microglitter. It dries to a semi-matte and somewhat gritty texture because of the glitters.

IMG_2317

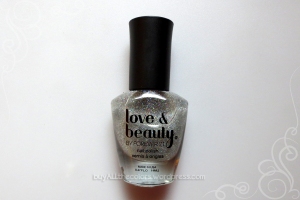
Next is a polish from Forever 21’s Love & Beauty. I really wish they would print the names of the polishes on the bottles, but after looking it up online, I think this one’s called First Snowfall.

IMG_2319

First Snowfall appears to be a linear holographic top coat. It never gets fully opaque, but you get a full coverage of holographic glitter in two coats. It also has a slightly gritty texture when dry from the glitter bits.

IMG_2320

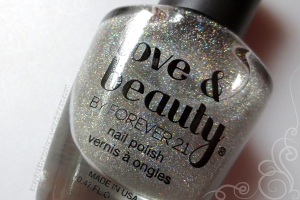
After that is another Love & Beauty polish. I can’t find the name of this one online though. If anyone knows what it’s called, please leave me a comment and tell me!

IMG_2322

This one is a silver scatter holo with small and medium glitters. The consistency was a little thinner than I would have liked, but definitely not the end of the world.

IMG_1678

Next is this unnamed Rue Beaute polish from Rue 21.

IMG_1680

This is a mix of small, medium, and large silver glitters. The consistency of this polish was super thin– I’d shake up the bottle, and by the time I had painted one nail, the glitters had all settled to the bottom again. Not the most fun to apply, but the actual glitters were awesome.

IMG_1428

Lastly is another Icing polish, Milky Way. I had actually used this one before in the Black and White day of OMD, but I never showed the bottle…so here it is!

IMG_1429

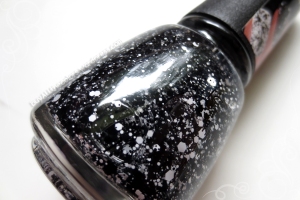
Milky Way is a black and white splatter polish with small, medium, and large black and white glitters, as well as black bar glitters. It’s quickly become one of my favorite toppers!

Whew, that was a lot of polishes. Ready for the final look? Please excuse my nail nubbins, it bothers me when my nails get so long that I can’t text properly, and this was right after I cut them.

IMG_2490

Like I said, I went a little bit crazy here. Thumb is two coats of Sugar Fix topped with two coats of the Rue Beaute glitter. Index finger is two coats of Twilight. Middle Finger is one coat of an old polish, Sinful Shine Steel Reserve, topped with two coats of the Love & Beauty holo glitter. Ring finger is 3 coats (although it’s as opaque as it’s going to get in 2) of First Snowfall, topped with two coats of Milky Way. Pinkie is two coats of Sugar Fix.

IMG_2500

I got massive amounts of bubbling on my middle finger because I got a bit impatient and globbed on the glitter, but I’m sure I would have had better results if I just brushed the polish on like a normal person. And why did I decide to use a holo topcoat as a base? Because I’m dumb and didn’t realize it was meant to be a topcoat I CAN, that’s why. I do kind of like the effect now anyway.

So which nail do you like best? Glitter, holographic, textured, splatter– so many nail trends to choose from lately! I know holo will always have a special place in my heart.